發表文章

LeetCode.145. Binary Tree Postorder Traversal(Easy)

問題描述:給定一個二叉樹,返回它的後序遍歷。 ans1. 1 2 3 4 5 6 7 8 9 10 11 12 13 14 15 16 17 18 19 20 21 22 23 24 25 26 27 28 29 30 31 32 33 34 35 36 /** * Definition for a binary tree node. * struct TreeNode { * int val; * TreeNode *left; * TreeNode *right; * TreeNode() : val(0), left(nullptr), right(nullptr) {} * TreeNode(int x) : val(x), left(nullptr), right(nullptr) {} * TreeNode(int x, TreeNode *left, TreeNode *right) : val(x), left(left), right(right) {} * }; */ class Solution { public: vector< int > postorderTraversal(TreeNode* root) { vector< int > result; if (root == nullptr) { return result; } stack<TreeNode*> nodes; nodes.push(root); while (!nodes.empty()) { TreeNode* node = nodes.top(); nodes.pop(); result.insert(result.begin(), node->val); if (node->left) { nodes.push(node-...

鼎新WorkFlow ERP GP_品號與客戶基本資料建立

圖片
  「報價單」 位於 訂單系統 「報價單」通常由業務交給主管後座確認核可之外 通常還要再丟給客戶確認 而客戶確認完就無法取消 基本資料通常會需要先維護客戶的基本資料建立還有品號基本資料建立 因為通常報價單一定會有所謂的對象(客戶)要自動去挑選 以及品號 若有新的客戶跟品號要建立就要再去基本資料去維護!!! 因此「客戶基本資料建立」、「品號基本資料建立」通常會頻繁使用 在鼎新ERP中編碼原則 客戶編碼預設原則會分為 第一碼:1(國內),2(國外客戶) 後三碼:流水號(001,002....最多可至999家) 客戶基本資料建立上邊碼也可自己做客製化建立 比方以月編碼為基準YYYYMM後面加流水三碼 品號以圖為例 光是第一碼為1的塑膠類就可以多達9999

使用leafletjs來做分店經緯度資訊可視化處裡

圖片
  User由於想要將分店資訊串接類似Google Map的可視化 類似全聯的官方網站做資訊優化 https://www.pxmart.com.tw/#/shopList 但GoogleMap其實要用它的API串接功能是要付費的(一般而言應該不想有這塊多餘成本) https://www.weya.com.tw/design/google-map-api-key 沒付費的情況下頂多就只能做iframe內嵌單掉了一些 這裡我改採用另一個策略 改採用leafletjs這套可以做到圖客製化顯示的套件 https://leafletjs.com/ 由於可以透過GoogleMap來擷取經緯度資訊 只是我們就不用它的圖層來做設計 搭配OpenStreetMap https://www.openstreetmap.org/search?query=25.069181447021986%2C%20121.61342333574706#map=11/25.0694/121.6132 這邊我就可以做自己icon的放置與圖層程式的設定控制 第一件事情就是取得分店經緯度列表 第二件事情抓個圖片當作地標icon顯示並且引入leafletjs 的 cdn <link rel="stylesheet" href="https://unpkg.com/leaflet@1.6.0/dist/leaflet.css"> <script src="https://unpkg.com/leaflet@1.6.0/dist/leaflet.js"></script> 在網面上可以配置一個div來存放圖資資訊 即可將圖層做一個經緯度與資訊的顯示 1 2 3 4 5 6 7 8 9 10 11 12 13 14 15 16 17 18 19 20 21 22 23 24 25 26 27 28 29 30 31 32 33 34 35 36 37 38 39 40 41 42 43 44 45 46 47 48 49 50 51 52 53 54 55 <link rel= "stylesheet" href= "https://unpkg.com/leafle...

Blazor第4天_Blazor_元件的處理part2.(CascadingParameter)

圖片
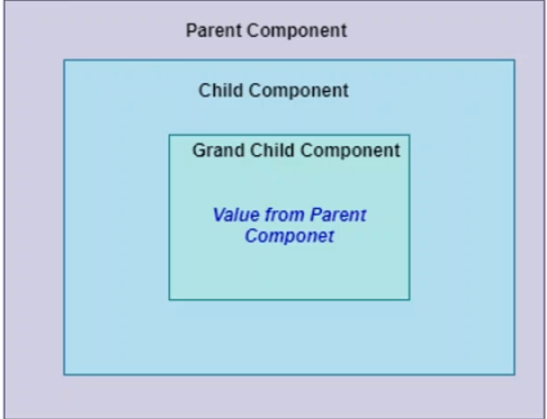
  Cascading values Pass data from an ancestor component to a descendant component. Add三個Component 一樣齁 為了不要重複寫很長的namespace值接一律統一在_Imports.razor做引入 ~\Pages\ParentComponent.razor 1 2 3 4 5 6 7 8 9 10 11 12 @page "/pc" <div style= "background-color:green" > <h3> ParentComponent </h3> <CascadingValue Value= "@Message" > <ChildComponent></ChildComponent> </CascadingValue> </div> @code { public string Message { get; set; } = "I am from Parent"; } ~\Controls\ChildComponent.razor 1 2 3 4 5 6 7 8 9 10 <div style= "background-color:yellow" > <h3> ChildComponent </h3> <GrandChildComponent></GrandChildComponent> <p> @MyMessage </p> </div> @code { [CascadingParameter] public string MyMessage { get; set; } } ~\Controls\GrandChildComponent.razor 1 2 3 4 5 6 7 8 9 <div styl...

Entity Framework筆記(二)_Database First使用方式

圖片
  EntityFramework 主要提供的Workflows有如下幾種 1. Database First 2. Model First 3. Code First 所謂DB First也就是EF跟既有的資料庫連接後對應資料表去生成相應Model Class 而這些Model類別會再去衍生出相應Entities跟Context的類別 在Model這一層事實上是Read-Only的任何異動都必須從DB來去下手 這裡準備好一個.net framework 的 ConsoleApp專案 並且準備好你的DB和相應Table 1 2 3 4 5 6 7 8 9 10 11 12 13 14 15 16 17 18 19 20 21 22 23 24 25 26 27 28 29 30 31 32 33 34 35 36 37 38 39 40 41 42 43 44 USE [Master]; GO CREATE DATABASE DatabaseFirstTestDB ON ( NAME = DBFirstData, /* Point to the directory wherer you want to store your db files */ FILENAME = 'E:\IT_Db\DBFirstTest.mdf' , SIZE = 10 MB, MAXSIZE = 50 MB, FILEGROWTH = 5 MB ) LOG ON ( NAME = DBFirstLog, /* Point to the directory wherer you want to store your db files */ FILENAME = 'E:\IT_Db\DBFirstLog.ldf' , SIZE = 5 MB, ...

Blazor第3天_Blazor_元件的處理part1.(跨元件存取,跨元件傳參,路由傳參)

圖片
  在前幾篇我們已經知道 Blazor Server主要透過SignalR來做Server跟Client端的效果連動 以下相關操作(不管是Blazor Server或者Blazor WASM都通用) 新建好一個 Blazor Server專案 新建一個Blazor Component 對Pages目錄右鍵選新增Razor元件 開始編輯 ~\Pages\MyFirstComponent.razor 1 2 3 4 5 6 7 8 9 @page "/mfc" <div style= "background-color:green" > <h3> My First Component </h3> <p> This is my first component </p> </div> @code { } 訪問自訂元件 再次執行我們的Blazor應用 並設定 /mfc路由即可成功訪問到我們自訂的元件 自訂元件B(子元件)包覆於自訂元件A(母元件)的情況 通常可能會在專案分門別類放置專門一個存放元件的目錄 這裡我命名Controls並新建第二個元件 ~\Controls\MySecondComponent.razor 1 2 3 4 5 6 7 <div style= "background-color:yellow" > <h3> My Second Component </h3> <p> This is my Second component </p> </div> @code { } 通常我們若想要直接在FirstComponent中存取SecondComponent 可以直接透過元件名稱類似html tag方式直接存取 ~\Pages\MyFirstComponent.razor 1 2 3 4 5 6 7 8 9 10 @page "/mfc" <div style= "background-color:green" > ...