Dlib19.7_Part2._FaceLandMark_人臉標記(點連線)編譯方法
於上一篇我們探討學習麻煩的建置流程

建議那個配置一次之後就用 拷貝專案Folder方式
去做下一份新專案
備份一個配置好的空專案
會方便許多喔~~~~~
Step1.先至官網下載人臉68個標註點 model
http://dlib.net/files/shape_predictor_68_face_landmarks.dat.bz2
下載下來應該會有一包 61MB大的檔案 直接用 Notepad去開會有亂碼看不懂

這裡不要跟我一樣忘記 解壓縮喔
一直感覺奇怪輸入沒錯 參數都配置好了
就是直接小嗨跳出結束 = =||| 令人汗顏
結果是第一個參數配置成為壓縮的壓縮檔
XDD
https://sourceforge.net/p/dclib/discussion/442518/thread/fe79827a/?limit=25

Step2.
配置參數

這裡請大家看一個範本程式
將shape_predictor_68_face_landmarks.dat檔案加載模型(第一個參數)
這裡用到所謂的 deserialize 處理過程
如果想知道
deserialize VS serialize
可以參考之前寫的 Blog
Advanced_C#_what is Serialization C#
http://coolmandiary.blogspot.tw/2016/09/advancedcwhat-is-serialization-c.html
serialize :Object轉為 以Bytes存放之資料
deserialize : 以Bytes存放之資料 轉為 Object
============================================================
Code學習摘自
Dlib 19.2+VS2015 人臉對齊
http://blog.csdn.net/qq_22764813/article/details/53054292


建議那個配置一次之後就用 拷貝專案Folder方式
去做下一份新專案
備份一個配置好的空專案
會方便許多喔~~~~~
Step1.先至官網下載人臉68個標註點 model
http://dlib.net/files/shape_predictor_68_face_landmarks.dat.bz2
下載下來應該會有一包 61MB大的檔案 直接用 Notepad去開會有亂碼看不懂

這裡不要跟我一樣忘記 解壓縮喔
一直感覺奇怪輸入沒錯 參數都配置好了
就是直接小嗨跳出結束 = =||| 令人汗顏
結果是第一個參數配置成為壓縮的壓縮檔
XDD
https://sourceforge.net/p/dclib/discussion/442518/thread/fe79827a/?limit=25

Step2.
配置參數

這裡請大家看一個範本程式
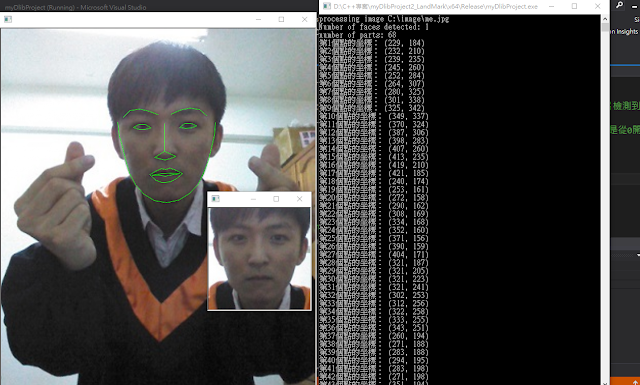
1 2 3 4 5 6 7 8 9 10 11 12 13 14 15 16 17 18 19 20 21 22 23 24 25 26 27 28 29 30 31 32 33 34 35 36 37 38 39 40 41 42 43 44 45 46 47 48 49 50 51 52 53 54 55 56 57 58 59 60 61 62 63 64 65 66 67 68 69 70 71 72 73 74 75 76 77 78 79 80 81 82 | #include<dlib\image_processing\frontal_face_detector.h> #include<dlib\image_processing\render_face_detections.h> #include<dlib\image_processing.h> #include<dlib\gui_widgets.h> #include<dlib\image_io.h> #include<iostream> using namespace dlib; using namespace std; int main(int argc, char ** argv) { //這個例子需要一系列的形狀模型和一系列的圖片 try { if (argc == 1) { cout << "Call this program like this:" << endl; cout << "./face_landmark_detection_ex shape_predictor_68_face_landmarks.dat faces/*.jpg" << endl; cout << "\nYou can get the shape_predictor_68_face_landmarks.dat file from:\n"; cout << "http://dlib.net/files/shape_predictor_68_face_landmarks.dat.bz2" << endl;//從這個地址下載模型標記點數據 return 0; } frontal_face_detector detector = get_frontal_face_detector(); //也需要一個形狀預測器,這是一個工具用來預測給定的圖片和臉邊界框的標記點的位置。 //這裡我們僅僅從shape_predictor_68_face_landmarks.dat文件加載模型 shape_predictor sp; //定義個shape_predictor類的實例 deserialize(argv[1]) >> sp; image_window win, win_faces; //循環所有圖片 cout << "processing image " << argv[2] << endl; array2d<rgb_pixel> img; //注意變量類型rgb_pixel三通道彩色圖像 load_image(img, argv[2]); // Make the image larger so we can detect small faces. pyramid_up(img); std::vector<rectangle> dets = detector(img); //檢測人臉,獲得邊界框 cout << "Number of faces detected: " << dets.size() << endl; //檢測到人臉的數量 std::vector<full_object_detection> shapes; //注意形狀變量的類型, for (unsigned long j = 0; j < dets.size(); ++j) { full_object_detection shape = sp(img, dets[j]); //預測姿勢,注意輸入是兩個,一個是圖片,另一個是從該圖片檢測到的邊界框 cout << "number of parts: " << shape.num_parts() << endl; //cout << "pixel position of first part: " << shape.part(0) << endl;//獲得第一個點的坐標,注意第一個點是從0開始的 //cout << "pixel position of second part: " << shape.part(1) << endl;//獲得第二個點的坐標 /*自己改寫,打印出全部68個點*/ for (int i = 1; i < 69; i++) { cout << "第" << i << "個點的坐標: " << shape.part(i - 1) << endl; } // You get the idea, you can get all the face part locations if // you want them. Here we just store them in shapes so we can // put them on the screen. shapes.push_back(shape); } //**** 顯示結果 win.clear_overlay(); win.set_image(img); win.add_overlay(render_face_detections(shapes)); //****我們也能提取每張剪裁後的人臉的副本,旋轉和縮放到一個標準尺寸 dlib::array<array2d<rgb_pixel> > face_chips; extract_image_chips(img, get_face_chip_details(shapes), face_chips); win_faces.set_image(tile_images(face_chips)); cout << "Hit enter to process the next image..." << endl; cin.get(); } catch (exception& e) { cout << "\nexception thrown!" << endl; cout << e.what() << endl; } } |
將shape_predictor_68_face_landmarks.dat檔案加載模型(第一個參數)
這裡用到所謂的 deserialize 處理過程
如果想知道
deserialize VS serialize
可以參考之前寫的 Blog
Advanced_C#_what is Serialization C#
http://coolmandiary.blogspot.tw/2016/09/advancedcwhat-is-serialization-c.html
serialize :Object轉為 以Bytes存放之資料
deserialize : 以Bytes存放之資料 轉為 Object
============================================================
Code學習摘自
Dlib 19.2+VS2015 人臉對齊
http://blog.csdn.net/qq_22764813/article/details/53054292


留言
張貼留言