openframeworks_多媒體開發函式庫_OSC_網路傳輸_Send and Receive the Parameters
OSC 遠端網路傳輸控制技術探討講座
全名 : Open Sound Control
時常出現的工作職務

人機互動軟體研發工程師
多媒體開發工程師
互動(軟體) / 交互式 工程師
擅長做特別硬體的架設及軟硬體整合
(Sensor(感測周邊元件)、體感裝置(Kinect、leapmotion)、生物傳感器(Biosensor)....etc)
擁有圖學方面深層知識
要經常外派,要到處跑跑走(出外探險)
要懂電路學
要和眾多硬體零件搏鬥並熟知規格細項
要具備「人機互動軟體設計」 ----> 聲訊、視訊、物理光學.....網路
要有嵌入式系統設計概念
參考 link:
https://www.youtube.com/watch?v=evPQvNZbqck&feature=youtu.be
http://www.ofcourse.io/index.html
https://www.104.com.tw/job/?jobno=4b1u9
https://www.104.com.tw/jobbank/custjob/index.php?r=cust&j=4e62456f586e4b6a585a3d233e30386193a3c446d363840693e443c1f1f1f1f619483c5e3361j01
一些工作場合
MTF London: Rebecca Fiebrink
The Machine Learning Pipeline
Plyaing sound according to facial expression [openFrameworks + wekinator + Max MSP]
黃怡靜同學 Openframeworks 介紹
這次我要跟大家分享主要用在
和 電腦、聲音合成器、體感裝置或是其他多媒體裝置做遠端溝通控制的
一個協定,OSC
分兩小節作介紹
(1)OSC protocol specifics
(2)Implementing sending and receiving OSC messages
(1)OSC protocol specifics
OSC它主要原理是藉由低延遲開放網路協定
(open sound control networking protocol intended for low-latency delivery)
分作傳送端及接收端
之間藉由傳遞 OSC messages 作溝通
且OSC messages 主要可乘載資料量不超過 1KB

多數OSC 是使用UDP網路協定去實作的
所以基本上UDP又被稱作不可靠傳輸
不需要做error檢查 更不用經過交握
(Based on UDP , so no "hand-shaking" required and no error checking !!!!)
OSC 協定 是最為適當被用來作為多個應用程式之間
多參數傳遞之媒介
至於剛剛所說的這些應用程式(Apps)可以是在同一台電腦上
或是同一網域下的不同台電腦裝置喔!!!
OSC message 的架構:
主要可分為
part1. Address (name of parameter) Ex: /move/x
part2. No , one or more Arguments Ex: (int , float , string , boolean)
OSC message主要包含了Address 和 一些參數
Address 是一個包含多個藉由forward slash symbol 去開始與修除的 tokens的字串
就像是URL的感覺,功能主要是去辨別區分OSC messages的標題
好讓接收端知道該如何抉擇要讓這些不同messages各自去執行特定指令功能
若不懂捨麼是forward slash symbol ----> / 這個斜線符號 啦!!!!
參考:https://www.computerhope.com/jargon/f/forwards.htm
此外OSC messages 還可以有一或多個參數
型態就跟一般寫程式時常看到那些整數、浮點、布林一樣
歸總來說
Address 就是 指令或參數的名字(稱呼)
Arguments 就是參數的value
(2)Implementing sending and receiving OSC messages
在openframeworks之中
主要是靠ofxOsc插件中
以下幾個類別去實作這些上述所講的功能
ofxOsc core Addon
- ofxOscSender
- ofxOscReceiver
- ofxOscMessage
Step1.
使用openframeworks 開啟一個新配置專案
Addons 選用: ofxOsc

開啟新的專案後基本上
架構又分為三部分
ofApp.h
1 2 3 4 5 6 7 8 9 10 11 12 13 14 15 16 17 18 19 20 21 22 23 24 | #pragma once #include "ofMain.h" class ofApp : public ofBaseApp{ public: void setup(); void update(); void draw(); void keyPressed(int key); void keyReleased(int key); void mouseMoved(int x, int y ); void mouseDragged(int x, int y, int button); void mousePressed(int x, int y, int button); void mouseReleased(int x, int y, int button); void mouseEntered(int x, int y); void mouseExited(int x, int y); void windowResized(int w, int h); void dragEvent(ofDragInfo dragInfo); void gotMessage(ofMessage msg); }; |
ofApp.cpp
1 2 3 4 5 6 7 8 9 10 11 12 13 14 15 16 17 18 19 20 21 22 23 24 25 26 27 28 29 30 31 32 33 34 35 36 37 38 39 40 41 42 43 44 45 46 47 48 49 50 51 52 53 54 55 56 57 58 59 60 61 62 63 64 65 66 67 68 69 70 71 | #include "ofApp.h" //-------------------------------------------------------------- void ofApp::setup(){ } //-------------------------------------------------------------- void ofApp::update(){ } //-------------------------------------------------------------- void ofApp::draw(){ } //-------------------------------------------------------------- void ofApp::keyPressed(int key){ } //-------------------------------------------------------------- void ofApp::keyReleased(int key){ } //-------------------------------------------------------------- void ofApp::mouseMoved(int x, int y ){ } //-------------------------------------------------------------- void ofApp::mouseDragged(int x, int y, int button){ } //-------------------------------------------------------------- void ofApp::mousePressed(int x, int y, int button){ } //-------------------------------------------------------------- void ofApp::mouseReleased(int x, int y, int button){ } //-------------------------------------------------------------- void ofApp::mouseEntered(int x, int y){ } //-------------------------------------------------------------- void ofApp::mouseExited(int x, int y){ } //-------------------------------------------------------------- void ofApp::windowResized(int w, int h){ } //-------------------------------------------------------------- void ofApp::gotMessage(ofMessage msg){ } //-------------------------------------------------------------- void ofApp::dragEvent(ofDragInfo dragInfo){ } |
main.cpp
1 2 3 4 5 6 7 8 9 10 11 12 13 | #include "ofMain.h" #include "ofApp.h" //======================================================================== int main( ){ ofSetupOpenGL(1024,768,OF_WINDOW); // <-------- setup the GL context // this kicks off the running of my app // can be OF_WINDOW or OF_FULLSCREEN // pass in width and height too: ofRunApp(new ofApp()); } |
Step2.
到ofApp.h 引用所需標頭
以及 宣告所需OSC傳輸/接收之類別型態
(PS:目前示範在同一台電腦 , 你可以試試在別台電腦下運行)

再切換至ofApp.cpp 檔案

於setup區塊針對 sender 及 receiver 作設定
指定sender目前位於捨麼主機位置 哪個port
指定receiver只能接收偵聽來自哪個特定port的封包
(port必須一致!!!)
在 ofxOscSender 類別 所宣告的變數sender中
我們呼叫到了 setup 的 method 參數兩個分別填上
hostname 及 port
這裡的 hotname 也可用 IP Address去寫
1 2 3 4 5 6 7 8 9 10 11 12 13 14 15 16 17 18 19 20 21 22 23 24 25 26 27 28 29 30 31 32 33 34 35 36 37 38 39 | class ofxOscSender { public: ofxOscSender(); ofxOscSender(const ofxOscSender & mom); ofxOscSender & operator=(const ofxOscSender & mom); /// send messages to hostname and port void setup( const std::string &hostname, int port ); /// send the given message void sendMessage( ofxOscMessage& message, bool wrapInBundle = true ); /// send the given bundle void sendBundle( ofxOscBundle& bundle ); /// creates a message using an ofParameter void sendParameter( const ofAbstractParameter & parameter); /// disables broadcast capabilities, usually call this before setup void disableBroadcast(); /// enabled broadcast capabilities (usually no need to call this, enabled by default) void enableBroadcast(); private: void setup(osc::UdpTransmitSocket * socket); void shutdown(); // helper methods for constructing messages void appendBundle( ofxOscBundle& bundle, osc::OutboundPacketStream& p ); void appendMessage( ofxOscMessage& message, osc::OutboundPacketStream& p ); void appendParameter( ofxOscBundle & bundle, const ofAbstractParameter & parameter, const std::string &address); void appendParameter( ofxOscMessage & msg, const ofAbstractParameter & parameter, const std::string &address); std::unique_ptr<osc::UdpTransmitSocket> socket; bool broadcast; std::string hostname; int port; }; |
在 ofxOscReceiver 類別中 我們也同樣呼叫了
setup 的 method
參數只填區別辨識跟誰傳message的對象 port
1 2 3 4 5 6 7 8 9 10 11 12 13 14 15 16 17 18 19 20 21 22 23 24 25 26 27 28 29 30 31 32 33 34 35 36 37 38 39 40 41 42 43 44 45 46 47 48 49 50 51 52 | class ofxOscReceiver : public osc::OscPacketListener { public: ofxOscReceiver(); ofxOscReceiver(const ofxOscReceiver & mom); ofxOscReceiver & operator=(const ofxOscReceiver & mom); /// listen_port is the port to listen for messages on void setup( int listen_port ); /// returns true if there are any messages waiting for collection bool hasWaitingMessages(); /// take the next message on the queue of received messages, copy its details into message, and /// remove it from the queue. return false if there are no more messages to be got, otherwise /// return true OF_DEPRECATED_MSG("Pass a reference instead of a pointer", bool getNextMessage( ofxOscMessage* msg)); bool getNextMessage( ofxOscMessage& msg ); bool getParameter(ofAbstractParameter & parameter); /// disables port reuse reuse which allows to use the same port by several sockets void disableReuse(); /// enabled broadcast capabilities (usually no need to call this, enabled by default) void enableReuse(); protected: /// process an incoming osc message and add it to the queue virtual void ProcessMessage( const osc::ReceivedMessage &m, const osc::IpEndpointName& remoteEndpoint ); private: void setup(osc::UdpListeningReceiveSocket * socket); // shutdown the listener void shutdown(); // start the listening thread #ifdef TARGET_WIN32 static DWORD WINAPI startThread( void* ofxOscReceiverInstance ); #else static void* startThread( void* ofxOscReceiverInstance ); #endif // socket to listen on std::unique_ptr<osc::UdpListeningReceiveSocket, std::function<void(osc::UdpListeningReceiveSocket*)>> listen_socket; std::thread listen_thread; ofThreadChannel<ofxOscMessage> messagesChannel; bool allowReuse; int listen_port; }; |
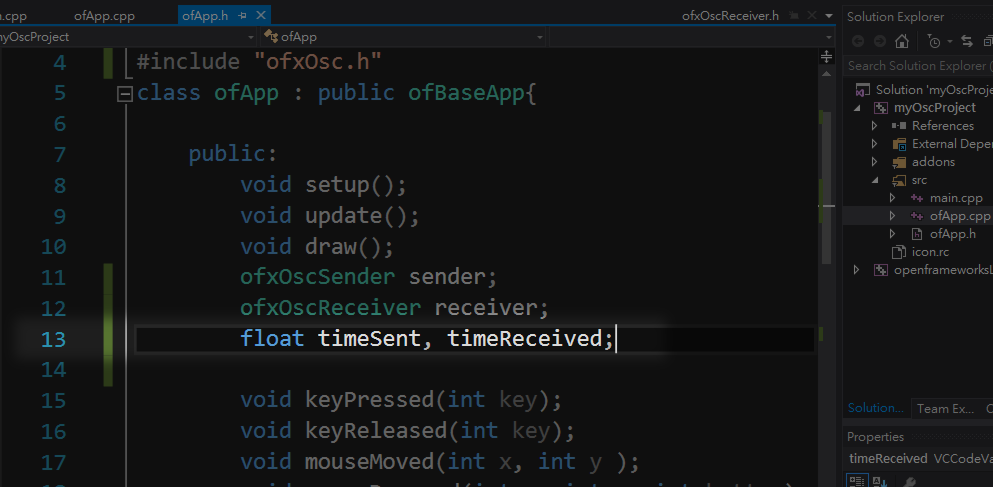
這裡由於我要顯示傳送端 跟 接收段各自更新的時間
所以回到剛剛的
ofApp.h
再多加宣告兩個 float 變數
這裡我們在 ofApp.cpp 中
void ofApp::update(){
}
撰寫ˋ以下Code

首先在程式每次更新之時
我們先取得 傳送端的程式執行經過時間(浮點)耗時存取
(使用ofGetElapsedTimef() method )
之後每次都會在更新一個畫面的同時
生成 OSC message
設定其Address 和 float型態之參數
傳送傳送端當下之耗時
給接收端
當接收端一直是有資料要等待接收的時候(為真 , 回傳true時)
生成OSC message 暫存
接收端就會持續取得下一個message
對每次來的osc message 進行address的檢查
若符合就設定 timeReceived 時候的 value給他的參數
在
void ofApp::draw(){
}

我們要將時間結果顯示於螢幕上
傳遞端耗時
接收端耗時
傳遞端耗時 - 接收端耗時

會發現在
傳遞端耗時 - 接收端耗時
顯示並非 總是 0
主要是因為 接收段目前是用第二個執行緒去執行
所以會有時間延遲差異喔!!


留言
張貼留言