.Net Core Web Api_筆記33_採用JWT的授權

用戶首次登入時,透過傳輸賬號密碼驗證身份,驗證成功後,Server產生的 Token 回應使用者。使用者後續請求只需要傳送 Token,服務器只需對 Token 進行校驗來確認身份。
在此一樣新增一個新專案來做JWT 實作

這邊在此模板的Controller上加上這個修飾[Authorize]
主要代表針對當前這個控制器下所有Action預設都是被套用權限授權控管的
都需要登入後判定有無權限才可存取
跟上一篇一樣操作

那一樣至 微軟github範本去搜查

Program.cs範本配置程式碼
可以將範例程式碼抄過來做測試微調
1 2 3 4 5 6 7 8 9 10 11 12 13 14 15 16 17 18 19 20 21 22 23 24 25 26 27 28 29 30 31 32 33 34 35 36 37 38 39 40 41 42 43 44 45 46 47 48 49 50 51 52 53 54 55 56 57 58 59 60 61 62 63 64 65 66 67 68 69 70 71 72 73 74 75 76 77 78 | using System.IdentityModel.Tokens.Jwt; using System.Security.Claims; using Microsoft.AspNetCore.Authentication.JwtBearer; using Microsoft.IdentityModel.Tokens; using Ticketer.Services; using Ticketer; JwtSecurityTokenHandler JwtTokenHandler = new JwtSecurityTokenHandler(); SymmetricSecurityKey SecurityKey = new SymmetricSecurityKey(Guid.NewGuid().ToByteArray()); string GenerateJwtToken(string name) { if (string.IsNullOrEmpty(name)) { throw new InvalidOperationException("Name is not specified."); } var claims = new[] { new Claim(ClaimTypes.Name, name) }; var credentials = new SigningCredentials(SecurityKey, SecurityAlgorithms.HmacSha256); var token = new JwtSecurityToken("ExampleServer", "ExampleClients", claims, expires: DateTime.Now.AddSeconds(60), signingCredentials: credentials); return JwtTokenHandler.WriteToken(token); } var builder = WebApplication.CreateBuilder(args); // Additional configuration is required to successfully run gRPC on macOS. // For instructions on how to configure Kestrel and gRPC clients on macOS, visit https://go.microsoft.com/fwlink/?linkid=2099682 // Add services to the container. builder.Services.AddGrpc(); builder.Services.AddSingleton<TicketRepository>(); builder.Services.AddAuthorization(options => { options.AddPolicy(JwtBearerDefaults.AuthenticationScheme, policy => { policy.AddAuthenticationSchemes(JwtBearerDefaults.AuthenticationScheme); policy.RequireClaim(ClaimTypes.Name); }); }); builder.Services.AddAuthentication(JwtBearerDefaults.AuthenticationScheme) .AddJwtBearer(options => { options.TokenValidationParameters = new TokenValidationParameters { ValidateAudience = false, ValidateIssuer = false, ValidateActor = false, ValidateLifetime = true, IssuerSigningKey = SecurityKey }; }); var app = builder.Build(); IWebHostEnvironment env = app.Environment; if (env.IsDevelopment()) { app.UseDeveloperExceptionPage(); } app.UseRouting(); app.UseAuthentication(); app.UseAuthorization(); // Configure the HTTP request pipeline. app.MapGrpcService<TicketerService>(); app.MapGet("/generateJwtToken", context => { return context.Response.WriteAsync(GenerateJwtToken(context.Request.Query["name"])); }); app.Run(); |
那配置好大致設定後的Program.cs (認證中間件必須放在使用Controller中間件之前)
1 2 3 4 5 6 7 8 9 10 11 12 13 14 15 16 17 18 19 20 21 22 23 24 25 26 27 28 29 30 31 32 33 34 35 36 37 38 39 40 41 42 43 44 45 46 47 48 49 50 51 52 53 54 55 56 57 58 59 60 61 62 63 64 65 66 67 68 69 70 71 | using Microsoft.AspNetCore.Authentication.JwtBearer; using Microsoft.IdentityModel.Tokens; using System.IdentityModel.Tokens.Jwt; using System.Security.Claims; var builder = WebApplication.CreateBuilder(args); JwtSecurityTokenHandler JwtTokenHandler = new JwtSecurityTokenHandler(); SymmetricSecurityKey SecurityKey = new SymmetricSecurityKey(Guid.NewGuid().ToByteArray()); string GenerateJwtToken(string name) { if (string.IsNullOrEmpty(name)) { throw new InvalidOperationException("Name is not specified."); } var claims = new[] { new Claim(ClaimTypes.Name, name) }; var credentials = new SigningCredentials(SecurityKey, SecurityAlgorithms.HmacSha256); var token = new JwtSecurityToken("ExampleServer", "ExampleClients", claims, expires: DateTime.Now.AddSeconds(60), signingCredentials: credentials); return JwtTokenHandler.WriteToken(token); } // Add services to the container. builder.Services.AddControllers(); // Learn more about configuring Swagger/OpenAPI at https://aka.ms/aspnetcore/swashbuckle builder.Services.AddEndpointsApiExplorer(); builder.Services.AddSwaggerGen(); builder.Services.AddAuthorization(options => { options.AddPolicy(JwtBearerDefaults.AuthenticationScheme, policy => { policy.AddAuthenticationSchemes(JwtBearerDefaults.AuthenticationScheme); policy.RequireClaim(ClaimTypes.Name); }); }); builder.Services.AddAuthentication(JwtBearerDefaults.AuthenticationScheme) .AddJwtBearer(options => { options.TokenValidationParameters = new TokenValidationParameters { ValidateAudience = false, ValidateIssuer = false, ValidateActor = false, ValidateLifetime = true, IssuerSigningKey = SecurityKey }; }); var app = builder.Build(); // Configure the HTTP request pipeline. if (app.Environment.IsDevelopment()) { app.UseSwagger(); app.UseSwaggerUI(); } app.UseAuthentication(); app.UseAuthorization(); app.MapControllers(); app.MapGet("/generateJwtToken", context => { return context.Response.WriteAsync(GenerateJwtToken(context.Request.Query["name"])); }); app.Run(); |
官方範本中
可以看到Policy採用JwtBearerDefaults.AuthenticationScheme
而在Authentication中針對JwtBearer Token驗證配置
主要只有針對Lifetime 以及 SigningKey開啟驗證機制
而每一次重新運行 token都會重新產生
那在swag進行測試API路由訪問
會回傳401無授權的訊息

我們可藉由cmd curl做測試
curl -v http://localhost:5153/WeatherForecast

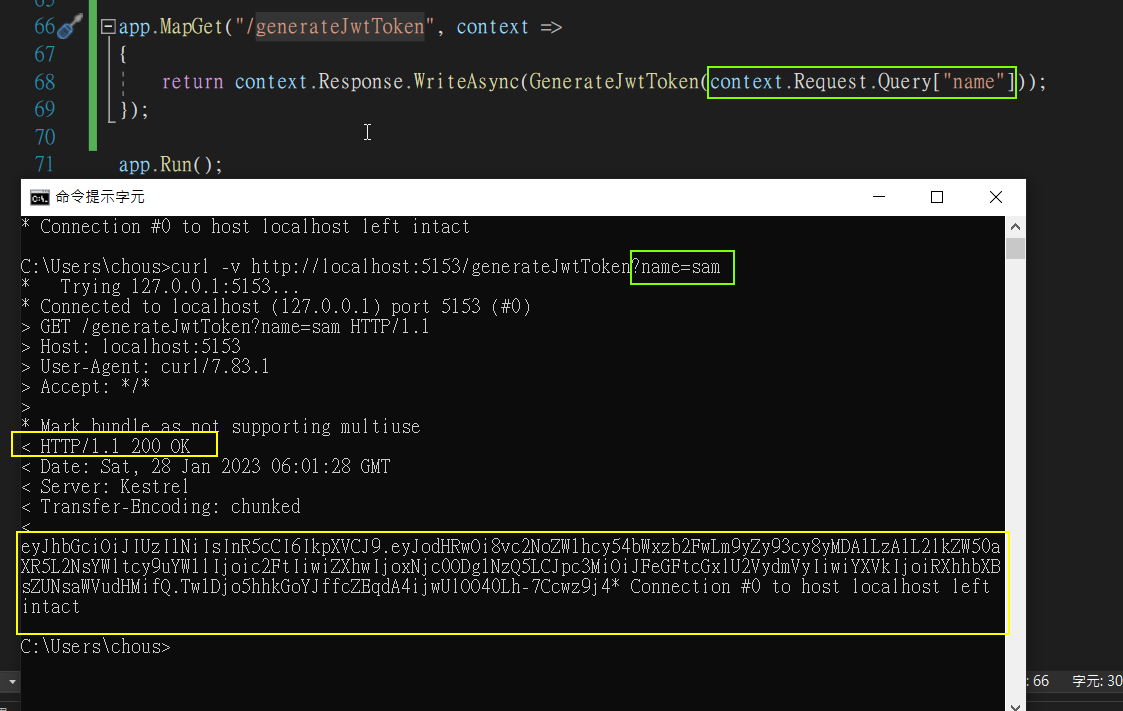
我們可以去呼叫產生token的路由,記得補上query get參數在路由網址後頭
curl -v http://localhost:5153/generateJwtToken?name=sam
就可拿到授權的token
再次訪問並指定Bearer token
token複製到*之前
curl -H後面雙引號要包覆"Authorization: Bearer {token字串}"
curl -v http://localhost:5153/WeatherForecast -H "Authorization: Bearer eyJhbGciOiJIUzI1NiIsInR5cCI6IkpXVCJ9.eyJodHRwOi8vc2NoZW1hcy54bWxzb2FwLm9yZy93cy8yMDA1LzA1L2lkZW50aXR5L2NsYWltcy9uYW1lIjoic2FtIiwiZXhwIjoxNjc0ODg1NzQ5LCJpc3MiOiJFeGFtcGxlU2VydmVyIiwiYXVkIjoiRXhhbXBsZUNsaWVudHMifQ.Tw1Djo5hhkGoYJffcZEqdA4ijwUlOO40Lh-7Ccwz9j4"
(備註: -H/--header 設定 request 裡所攜帶的 header)

若想去解析這串token對應到底捨麼內容
可以到jwt.io
粘貼到encode可對應解析不同part資料

JWT由三部分組成

Base64編碼的Header
Base64編碼的Payload
簽名
三部分用點間隔。
第一部分以Base64編碼的Header主要包括Token的類型和所使用的算法
{
   "alg": "HS265",
   "typ": "JWT"
}
第二部分以Base64編碼的Payload主要包含的是聲明、宣告(Claims)
可以說就是存放溝通訊息的地方,在定義上有 3 種聲明 (Claims)
Reserved (註冊聲明)
Public (公開聲明)
Private (私有聲明)
Claims有點類似你身分證欄位有幾個用於識別用途的
如下:
{
    "exp": 1674885749,
    "iss": "ExampleServer",
    "aud": "ExampleClients"
}
像exp就代表有效時間,在此是用unix 時間戳
https://www.unixtimestamp.com/
可用這個來轉換對應西元年月日
iss跟aud則分別代表issuer以及audience
issuer代表頒發Token的Web應用程式
audience是Token的受理者
如果是依賴第三方來創建的Token,這兩個參數肯定必須要指定,因為
第三方本來就不被受信任,如此設置這兩個參數後,我們可驗證這兩個參數。
註冊聲明參數 (建議但無強制性)
iss (Issuer) - jwt簽發者
sub (Subject) - jwt所面向的用戶
aud (Audience) - 接收jwt的一方
exp (Expiration Time) - jwt的過期時間,這個過期時間必須要大於簽發時間
nbf (Not Before) - 定義在什麼時間之前,該jwt都是不可用的
iat (Issued At) - jwt的簽發時間
jti (JWT ID) - jwt的唯一身份標識,主要用來作為一次性token,從而迴避重放攻擊
(PS:Exp和Nbf是使用Unix時間戳字串)
第三部分則是將Key通過對應的加密算法生成簽名(Signature)
由三個部分組成
header (base64後的)
payload (base64後的)
secret
HMACSHA256(base64UrlEncode(header) + "." + base64UrlEncode(payload), 'secret')secret 需存留在 server-side,jwt 的 簽發驗證都必須使用這個 secret,
當其他人得知這個 secret,那就意味著client-side是可以自我簽發 jwt ,因此
在任何場景都不應該外流

JwtSecurityToken
代表一個jwt token,可以直接用此物件產生token字串,也可以使用token字串創建此物件
簽名算法
HS256 (HMAC with SHA-256)
HS256 Signing Algorithm 使用密鑰生成固定的簽名,
簡單地說,HS256必須與任何想要驗證 JWT的 客戶端或 API共享秘密。
與任何其他對稱算法(symmetric keyed hashing algorithm)一樣,相同的秘密用於簽名和驗證 JWT。
HS256 is a symmetric algorithm that shares one secret key between the identity provider and your application. The same key is used to sign a JWT and allow verification that signature.
RS256 (RSA Signature with SHA-256)
RS256 Signing Algorithm
RS256使用成非對稱進行(asymmetric algorithm)簽名。
使用私鑰來簽名 JWT,並且必須使用對應的公鑰來驗證簽名。
RS256 algorithm is an asymmetric algorithm that uses a private key to sign a JWT and a public key to verification that signature.
當然就安全性考量會比較推薦採用RS256這類非對稱式加密算法
對稱式加密(加密跟解密使用的是同一把):又經常被稱作私鑰加密,意思是指訊息發送方和接收方使用同一把密鑰去進行資料的加解密,特點是演算法都是公開的,加解密的速度也快。適用於針對大量資料的情況做使用。
加密過程:明文+加密演算法+私鑰->密文
解密過程:密文+解密算法+私鑰->明文
非對稱式加密(加密跟解密使用的是不同把):又常被稱作公鑰加密,相對於對稱式加密是較為安全的。因為對稱式加密溝通傳輸過程當中雙方使用同一把密鑰,若其中一方的密鑰遭洩漏那整個傳輸通訊過程就會被破解。
至於非對式加密則是使用一對密鑰而非只有一把,分為公鑰與私鑰,且兩者成對出現。
私鑰是自己留存不可對外洩漏,而公鑰則是公開的密鑰,任何人都能獲取。
用公鑰or私鑰鍾任一個來作加密用另一個進行解密。
若是採用公鑰加密的密文則只能用私鑰解密
加密過程:
明文+加密算法+公鑰 -> 密文
解密過程:
密文+解密算法+私鑰->明文
若是採用私鑰加密過的密文則只能用公鑰解密
加密過程:
明文+加密算法+私鑰 -> 密文
解密過程:
密文+解密算法+公鑰 ->明文
這裡我們可以安置一個api action
用上一篇範例來直接判定目前存取者是誰
1 2 3 4 5 6 7 8 9 10 11 12 13 14 15 16 17 18 19 20 21 22 23 24 25 26 27 28 29 30 31 32 33 34 35 36 37 38 39 40 41 42 43 44 45 46 47 48 49 50 51 52 53 54 55 56 | using Microsoft.AspNetCore.Authentication; using Microsoft.AspNetCore.Authorization; using Microsoft.AspNetCore.Mvc; using System.Text; namespace JwtAuth.Controllers { [Authorize] [ApiController] [Route("[controller]")] public class WeatherForecastController : ControllerBase { private static readonly string[] Summaries = new[] { "Freezing", "Bracing", "Chilly", "Cool", "Mild", "Warm", "Balmy", "Hot", "Sweltering", "Scorching" }; private readonly ILogger<WeatherForecastController> _logger; public WeatherForecastController(ILogger<WeatherForecastController> logger) { _logger = logger; } [HttpGet(Name = "GetWeatherForecast")] public IEnumerable<WeatherForecast> Get() { return Enumerable.Range(1, 5).Select(index => new WeatherForecast { Date = DateTime.Now.AddDays(index), TemperatureC = Random.Shared.Next(-20, 55), Summary = Summaries[Random.Shared.Next(Summaries.Length)] }) .ToArray(); } [HttpGet] [Route("/get1")] public string GetInfo() { StringBuilder sb = new StringBuilder(); sb.AppendLine(User.Identity!.Name); sb.AppendLine(User.Identity!.AuthenticationType); sb.AppendLine(User.Identity!.IsAuthenticated.ToString()); sb.AppendLine(User.Identity!.ToString()); var items = Request.HttpContext.AuthenticateAsync().Result; foreach (var item in items.Properties!.Items) { sb.AppendLine(item.Key + "," + item.Value); } return sb.ToString(); } } } |
這裡若我再次重新啟動web api並cmd重新curl一次同樣token會報
The signature key was not found
原因就在於token會失效而且每次都重新生成

* Mark bundle as not supporting multiuse
< HTTP/1.1 401 Unauthorized
< Content-Length: 0
< Date: Sat, 28 Jan 2023 07:15:02 GMT
< Server: Kestrel
< WWW-Authenticate: Bearer error="invalid_token", error_description="The signature key was not found"
<
* Connection #0 to host localhost left intact
在此我們重新去要一個token
curl -v http://localhost:5153/generateJwtToken?name=sam

再重新攜帶token來請求資源就可訪問的到

我們可再次請求/get1來判定身分 打上來是誰
curl -v http://localhost:5153/get1 -H "Authorization: Bearer eyJhbGciOiJIUzI1NiIsInR5cCI6IkpXVCJ9.eyJodHRwOi8vc2NoZW1hcy54bWxzb2FwLm9yZy93cy8yMDA1LzA1L2lkZW50aXR5L2NsYWltcy9uYW1lIjoic2FtIiwiZXhwIjoxNjc0ODkxMDM3LCJpc3MiOiJFeGFtcGxlU2VydmVyIiwiYXVkIjoiRXhhbXBsZUNsaWVudHMifQ.NbFqzMkMoZ4KdDpullFNTIigKowlMkxetQQLOyTgMCI"


sam
AuthenticationTypes.Federation
True
System.Security.Claims.ClaimsIdentity
.expires,Sat, 28 Jan 2023 07:30:37 GMT
.Token.access_token,eyJhbGciOiJIUzI1NiIsInR5cCI6IkpXVCJ9.eyJodHRwOi8vc2NoZW1hcy54bWxzb2FwLm9yZy93cy8yMDA1LzA1L2lkZW50aXR5L2NsYWltcy9uYW1lIjoic2FtIiwiZXhwIjoxNjc0ODkxMDM3LCJpc3MiOiJFeGFtcGxlU2VydmVyIiwiYXVkIjoiRXhhbXBsZUNsaWVudHMifQ.NbFqzMkMoZ4KdDpullFNTIigKowlMkxetQQLOyTgMCI
.TokenNames,access_token
列印資訊可以看的到 認證型別以及失效日
Ref:


留言
張貼留言