Flutter_開發手機應用筆記1_底部TAB頁籤(Window上Android Studio配置)

首先Android Studio記得安裝下載好
起手式下載安裝flutter sdk
根據不同開發平台需下載相應SDK

在Windows平台
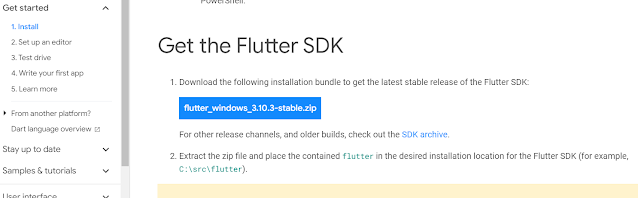
解壓後直接放到C槽根目錄並添加至系統環境變數當中

系統環境變數添加

接著開啟命令提示字元小黑視窗敲下面指令
flutter doctor來查檢相關環境配置是否順利

開啟Android Studio並進行Flutter套件配置
先新增一個空專案

更改專案SDK選定版本後 按Finish


到File -> Settings視窗在搜尋plugin
指定flutter關鍵字查找

此時對應又會跳要多載Dart的字眼視窗(因為Flutter這個plugin是基於dart的)

Restart Android Studio

選New flutter project
之後選左側Flutter 指定對應flutter sdk位置

再下一步就是命名專案名稱(注意只能用下滑線直接橫槓是不可以的)

專案就新增好了

四個資料夾:
android:原生 Android 的 code base。
ios:原生 iOS 的 code base。
lib:Flutter 程式碼位置。
test:單元測試。
另外,pubspec.yaml 定義了 flutter 相關的參數。
在上半部這邊主要是挑選騎程式預設要執行哪隻下拉選單
其中在lib目錄下的main.dart就是整個應用程式的進入點

點選AVD Manager進行模擬器的建立

當創建好後按Finish
若發現出現此錯誤
代表Android有相關環境變數配置有尚未設置的

暫時沒配置還好
左上角選單就可從預設No selected device跳到有配置的模擬手機實體環境

等一陣子後就可看到一個預設範例按按鈕加一壘加的功能顯示出來

如果感覺load十分慢
可參考官方文件
設定 Android Emulator 的硬體加速功能
https://developer.android.com/studio/run/emulator-acceleration?hl=zh-tw
進行設置

通常建議使用x86會較快

配置專案大致目錄架構
新增目錄分門別類

創建好
component ->用於畫面共用元件封裝
config -> 類似api參數,字體,顏色等配置
page->各頁目錄
data->跟資料庫相關資料
model->一些資料傳輸定義相關結構(使用者model,訂單model,購物車model....)
config目錄下定義幾分dart檔案

使用一個單一的index.dart用於導出其餘dart程式檔案


預設程式進入點->帶出範例主要區域是黃色被景框選範圍(底下可刪除)保留黃色圈選範圍
./lib/main.dart
1 2 3 4 5 6 7 8 9 10 11 12 13 14 15 16 17 18 19 20 21 22 23 24 25 26 27 28 29 30 31 32 33 34 35 36 37 38 39 40 41 42 43 44 45 46 47 48 49 50 51 52 53 54 55 56 57 58 59 60 61 62 63 64 65 66 67 68 69 70 71 72 73 74 75 76 77 78 79 80 81 82 83 84 85 86 87 88 89 90 91 92 93 94 95 96 97 98 99 100 101 102 103 104 105 106 107 108 109 110 111 112 113 114 115 116 117 118 119 120 121 122 123 124 125 | import 'package:flutter/material.dart'; void main() { runApp(const MyApp()); } class MyApp extends StatelessWidget { const MyApp({super.key}); // This widget is the root of your application. @override Widget build(BuildContext context) { return MaterialApp( title: 'Flutter Demo', theme: ThemeData( // This is the theme of your application. // // TRY THIS: Try running your application with "flutter run". You'll see // the application has a blue toolbar. Then, without quitting the app, // try changing the seedColor in the colorScheme below to Colors.green // and then invoke "hot reload" (save your changes or press the "hot // reload" button in a Flutter-supported IDE, or press "r" if you used // the command line to start the app). // // Notice that the counter didn't reset back to zero; the application // state is not lost during the reload. To reset the state, use hot // restart instead. // // This works for code too, not just values: Most code changes can be // tested with just a hot reload. colorScheme: ColorScheme.fromSeed(seedColor: Colors.deepPurple), useMaterial3: true, ), home: const MyHomePage(title: 'Flutter Demo Home Page'), ); } } class MyHomePage extends StatefulWidget { const MyHomePage({super.key, required this.title}); // This widget is the home page of your application. It is stateful, meaning // that it has a State object (defined below) that contains fields that affect // how it looks. // This class is the configuration for the state. It holds the values (in this // case the title) provided by the parent (in this case the App widget) and // used by the build method of the State. Fields in a Widget subclass are // always marked "final". final String title; @override State<MyHomePage> createState() => _MyHomePageState(); } class _MyHomePageState extends State<MyHomePage> { int _counter = 0; void _incrementCounter() { setState(() { // This call to setState tells the Flutter framework that something has // changed in this State, which causes it to rerun the build method below // so that the display can reflect the updated values. If we changed // _counter without calling setState(), then the build method would not be // called again, and so nothing would appear to happen. _counter++; }); } @override Widget build(BuildContext context) { // This method is rerun every time setState is called, for instance as done // by the _incrementCounter method above. // // The Flutter framework has been optimized to make rerunning build methods // fast, so that you can just rebuild anything that needs updating rather // than having to individually change instances of widgets. return Scaffold( appBar: AppBar( // TRY THIS: Try changing the color here to a specific color (to // Colors.amber, perhaps?) and trigger a hot reload to see the AppBar // change color while the other colors stay the same. backgroundColor: Theme.of(context).colorScheme.inversePrimary, // Here we take the value from the MyHomePage object that was created by // the App.build method, and use it to set our appbar title. title: Text(widget.title), ), body: Center( // Center is a layout widget. It takes a single child and positions it // in the middle of the parent. child: Column( // Column is also a layout widget. It takes a list of children and // arranges them vertically. By default, it sizes itself to fit its // children horizontally, and tries to be as tall as its parent. // // Column has various properties to control how it sizes itself and // how it positions its children. Here we use mainAxisAlignment to // center the children vertically; the main axis here is the vertical // axis because Columns are vertical (the cross axis would be // horizontal). // // TRY THIS: Invoke "debug painting" (choose the "Toggle Debug Paint" // action in the IDE, or press "p" in the console), to see the // wireframe for each widget. mainAxisAlignment: MainAxisAlignment.center, children: <Widget>[ const Text( 'You have pushed the button this many times:', ), Text( '$_counter', style: Theme.of(context).textTheme.headlineMedium, ), ], ), ), floatingActionButton: FloatingActionButton( onPressed: _incrementCounter, tooltip: 'Increment', child: const Icon(Icons.add), ), // This trailing comma makes auto-formatting nicer for build methods. ); } } |
在Flutter中有兩種畫面模式
無狀態(StatelessWidget)
初始化後都不會改變狀態的 widget,那就選擇StatelessWidget,所以當他
初始化後,不會重新創建自己。
初始化後,不會重新創建自己。
有狀態(StatefulWidget)
StatefulWidget 可以透過 setState 再一次重繪,但相當耗費運算資源因此建議少用。
快捷
st選單選特定
stful或者stless 按TAB或是ENTER 就可快速產生所需程式區塊

更改如下程式
修改後的版本./lib/main.dart
1 2 3 4 5 6 7 8 9 10 11 12 13 14 15 16 17 18 19 20 21 22 23 24 25 26 | import 'package:flutter/material.dart'; import 'package:myflutter_app1/config/index.dart'; import 'package:myflutter_app1/page/main_page.dart'; void main() { runApp(const MyApp()); } class MyApp extends StatelessWidget { const MyApp({super.key}); // This widget is the root of your application. @override Widget build(BuildContext context) { return MaterialApp( title: MyStringInfo.MAIN_TITLE, debugShowCheckedModeBanner: false, theme: ThemeData( primarySwatch: Colors.green , //colorScheme: ColorScheme.fromSeed(seedColor: Colors.deepPurple), //useMaterial3: true, ), home: MainPage(), ); } } |
./page/main_page.dart
1 2 3 4 5 6 7 8 9 10 11 12 13 14 15 16 17 18 19 | import 'package:flutter/material.dart'; class MainPage extends StatefulWidget{ _MainPageState createState() => _MainPageState(); } class _MainPageState extends State<MainPage>{ @override Widget build(BuildContext context) { // TODO: implement build return Scaffold( appBar: AppBar( title: Text('首頁'), ), body: Container(), ); } } |
myflutter_app1/config/index.dart當中間接引入一些共用文字訊息字串
未來若有要更改有跨頁都使用相同文字資訊時候就可只改一個地方來連動
利於後續維護
lib/config/string.dart
1 2 3 4 5 6 7 8 9 10 11 12 13 14 15 16 17 18 19 20 21 22 23 24 25 26 27 28 29 30 31 32 33 34 35 36 37 38 39 40 41 42 43 44 45 46 47 48 49 50 51 52 53 54 55 56 57 | class MyStringInfo{ static const String MAIN_TITLE = '熊獲利'; static const String HOME_TITLE = '首頁'; static const String EACH_BUSINESSES = '各項業務'; static const String NOTIFY_INFO = '通知'; static const String CART_TITLE = '購物車'; static const String MENMBER_TITLE = '顧客中心'; static const String CATEGORY_TITLE = '分類'; static const String LOADING = '加載中'; static const String NEW_GOOD_TITLE = '最新商品'; static const String NO_MORE_DATA = '暫時沒有數據'; static const String GOOD_DETAIL_TITLE = '商品詳情'; static const String ADD_TO_CART = '加入購物車'; static const String BUY_GOOD = '立即購買'; static const String CART_TITLET = '購物車'; static const String CHECK_ALL = '全選'; static const String ALL_PRICE = '合計'; static const String ORDER_TITLE = '我的訂單'; static const String LOGIN_TITLE = '登入'; static const String LOGOUT_TITLE = '退出登入'; static const String FORGET_PASSWORD = '忘記密碼'; static const String FAST_REGISTER = '快速註冊'; static const String PLEASE_INPUT_NAME = '請輸入用戶名'; static const String PLEASE_INPUT_PWD = '請輸入密碼'; static const String PLEASE_INPUT_MOBILE = '請輸入手機號'; static const String PLEASE_INPUT_ADDRESS = '請輸入地址'; static const String LOGIN_SUCCESS = '登入成功'; static const String LOGIN_FAILED = '帳號或密碼錯誤'; static const String REGISTER_SUCCESS = '註冊成功'; static const String REGISTER_FAILED = '註冊失敗'; static const String REGISTER_TITLE = '註冊'; static const String USERNAME = '帳號'; static const String PASSWORD = '密碼'; static const String MOBILE = '手機'; static const String ADDRESS = '地址'; static const String LOGIN_OR_REGISTER = "登入/註冊"; static const String ALL_ORDER = "全部訂單"; static const String MY_COLLECT = "我的收藏"; static const String ONLINE_SERVICE = "在線客服"; static const String ABOUT_US = "關於我們"; static const String MY_COUPON = "我的優惠券"; static const String GOOD_LIST_TITLE = "商品列表"; static const String GOOD_LIST_PRICE = "價格"; static const String SETTLE_ACCOUNT = "結算"; static const String ADD_SUCCESS = "添加成功"; static const String GOOD_SN = "編號"; static const String ORI_PRICE = "原價"; static const String WRITE_ORDER = "填寫訂單"; static const String EXPRESS = "運費"; static const String USER_NAME = "姓名"; static const String SUBMIT_ORDER = "提交訂單"; static const String MY_ORDER = "我的訂單"; static const String ORDER_DETAIL = "訂單詳情"; static const String PLEASE_LOGIN = "請登入"; static const String WRITE_ORDER_TITLE = "填寫訂單"; } |
運行出來會長這樣

這邊目前建立的其實不算首頁 ,算主頁。
新建相應5個子畫面要配置在這個主頁上的
首頁(lib/page/home/HomePage.dart)
1 2 3 4 5 6 7 8 9 10 11 12 13 14 15 16 17 18 19 | import 'package:flutter/material.dart'; class HomePage extends StatefulWidget{ _HomePageState createState() => _HomePageState(); } class _HomePageState extends State<HomePage>{ @override Widget build(BuildContext context) { // TODO: implement build return Scaffold( appBar: AppBar( title: Text('首頁'), ), body: Container(), ); } } |
各項業務(lib/page/business/BusinessPage.dart)
1 2 3 4 5 6 7 8 9 10 11 12 13 14 15 16 17 18 19 | import 'package:flutter/material.dart'; class BusinessPage extends StatefulWidget{ _BusinessPageState createState() => _BusinessPageState(); } class _BusinessPageState extends State<BusinessPage>{ @override Widget build(BuildContext context) { // TODO: implement build return Scaffold( appBar: AppBar( title: Text('各項業務'), ), body: Container(), ); } } |
通知(lib/page/notify/NotifyPage.dart)
1 2 3 4 5 6 7 8 9 10 11 12 13 14 15 16 17 18 19 | import 'package:flutter/material.dart'; class NotifyPage extends StatefulWidget{ _NotifyPageState createState() => _NotifyPageState(); } class _NotifyPageState extends State<NotifyPage>{ @override Widget build(BuildContext context) { // TODO: implement build return Scaffold( appBar: AppBar( title: Text('通知'), ), body: Container(), ); } } |
購物車(lib/page/cart/CartPage.dart)
1 2 3 4 5 6 7 8 9 10 11 12 13 14 15 16 17 18 19 | import 'package:flutter/material.dart'; class CartPage extends StatefulWidget{ _CartPageState createState() => _CartPageState(); } class _CartPageState extends State<CartPage>{ @override Widget build(BuildContext context) { // TODO: implement build return Scaffold( appBar: AppBar( title: Text('購物車'), ), body: Container(), ); } } |
顧客中心(lib/page/user/member_page.dart)
1 2 3 4 5 6 7 8 9 10 11 12 13 14 15 16 17 18 19 | import 'package:flutter/material.dart'; class MemberPage extends StatefulWidget{ _MemberPageState createState() => _MemberPageState(); } class _MemberPageState extends State<MemberPage>{ @override Widget build(BuildContext context) { // TODO: implement build return Scaffold( appBar: AppBar( title: Text('顧客中心'), ), body: Container(), ); } } |
在微調最終的 lib/page/main_page.dart
1 2 3 4 5 6 7 8 9 10 11 12 13 14 15 16 17 18 19 20 21 22 23 24 25 26 27 28 29 30 31 32 33 34 35 36 37 38 39 40 41 42 43 44 45 46 47 48 49 50 51 52 53 54 55 56 57 58 59 60 61 62 63 64 65 66 67 68 69 70 71 72 73 74 75 | import 'package:flutter/material.dart'; import 'package:myflutter_app1/config/index.dart'; import 'package:myflutter_app1/page/home/HomePage.dart'; //首頁 import 'package:myflutter_app1/page/business/BusinessPage.dart'; //各項業務 import 'package:myflutter_app1/page/notify/NotifyPage.dart'; //通知 import 'package:myflutter_app1/page/cart/CartPage.dart'; //購物車 import 'package:myflutter_app1/page/user/member_page.dart'; //顧客中心 class MainPage extends StatefulWidget{ _MainPageState createState() => _MainPageState(); } class _MainPageState extends State<MainPage>{ int _currentIndex = 0; //https://fontawesomeicons.com/flutter/icons List<BottomNavigationBarItem> _tabs = [ BottomNavigationBarItem(//首頁 icon:Icon(Icons.home), label: MyStringInfo.HOME_TITLE ), BottomNavigationBarItem(//各項業務 icon:Icon( Icons.business_center), label: MyStringInfo.EACH_BUSINESSES ), BottomNavigationBarItem( icon: Icon( Icons.circle_notifications), label: MyStringInfo.NOTIFY_INFO ), BottomNavigationBarItem( icon:Icon(Icons.shopping_cart), label: MyStringInfo.CART_TITLE ), BottomNavigationBarItem( icon:Icon(Icons.person), label: MyStringInfo.MENMBER_TITLE ), ]; @override Widget build(BuildContext context) { // TODO: implement build return Scaffold( bottomNavigationBar: BottomNavigationBar( type: BottomNavigationBarType.fixed, currentIndex: _currentIndex, items: _tabs, onTap: (index){ this.setState(() { _currentIndex = index; }); }, ), body: IndexedStack( index: _currentIndex, children: [ HomePage(),//首頁 BusinessPage(),//各項業務 NotifyPage(),//通知 CartPage(),//購物車 MemberPage()//顧客中心 ], ), /* appBar: AppBar( title: Text('主頁'), ), body: Container(), */ ); } } |
Ref:


留言
張貼留言